Features
Feature Flags enable you to change your application's behavior from within the GrowthBook UI. For example, turn on/off a sales banner or change the title of your pricing page.
You can set a global value for everyone, use advanced targeting to assign values to users, and run experiments to see which value is better.
Feature flags aren't limited to front-end changes. Use them on your back-end to gradually release a new ML model or enable new fields in an API response.
Environments
GrowthBook comes with one environment by default (production), but you can add as many as you need.
Feature flags can be enabled and disabled on a per-environment basis.
When a feature is disabled in an environment, it will always evaluate to null and ignore any other targeting or override rules.
It's possible for a feature to be enabled for an environment and still be considered "off". This happens when its value is set to false, null, 0, or an empty string.
Feature Keys
Every feature is defined by a unique key. This is what the engineering team will reference in their code when they check the value of a feature. Feature keys cannot be changed after they are created, so take care when choosing one.
Feature keys must be all lowercase and include only letters, numbers, hyphens, and underscores.
Some examples of good feature keys:
onboarding-checklist- ON/OFF flag for a featurecheckout_button_color- The color of the checkout buttonresults-per-page- Number of search results to show per page
Feature Types
Features can be a simple ON/OFF flag or a more complex data type (strings, numbers or JSON).
ON/OFF flags can support any of the following use cases:
- Decouple code deploys and releases
- Kill switch for production
- Gradual rollout of features
- Complex targeting and segmentation of features
- Validating feature releases with A/B tests
More complex data types enable you to have more than 2 possible states. For example, if you have a checkout button that is currently blue, you could use an ON/OFF flag called new-button-color that sets it to red when ON, but this is pretty limiting since you can't easily try other colors in the future. Instead, if you use a flag button-color and make it a string data type, you can easily set the value to 'blue', 'red', 'green', or any other color without changing your code.
Targeting Attributes
Feature values can be targeted to specific users or groups of users. In order for this to work, you must pass targeting attributes into the GrowthBook SDK and also list them in the GrowthBook App.
This is an example of specifying the targeting attributes in the SDK:
growthbook.setAttributes({
  id: user.id,
  email: user.email,
  country: user.country,
  url: window.location.href,
  userAgent: navigator.userAgent,
  admin: user.isAdmin,
  age: user.age,
});
You can update the attributes in the GrowthBook App under Settings > Attributes:
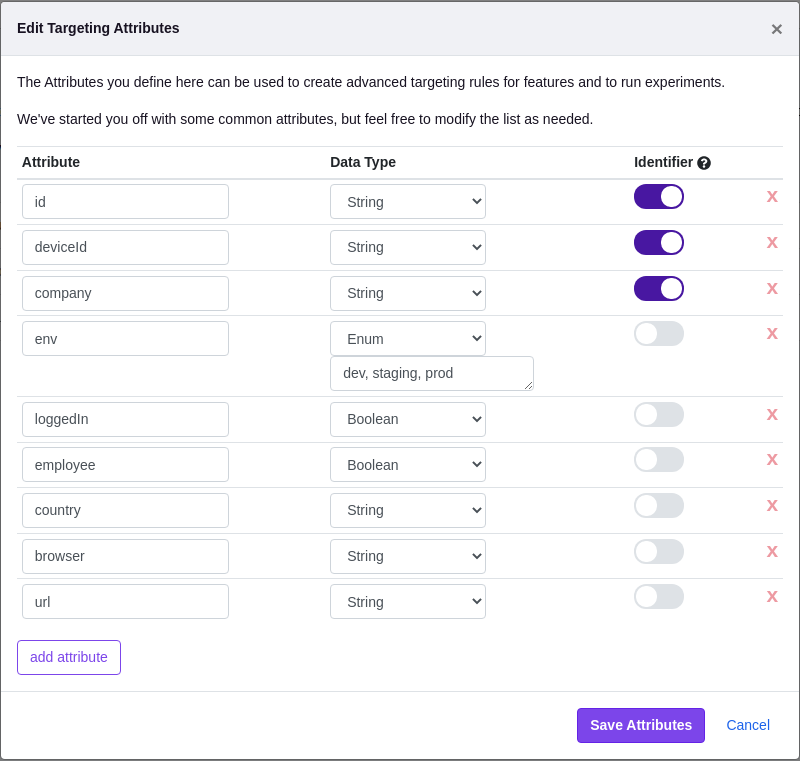
The actual values of the targeting attributes (e.g. the user ids, emails, etc.) are never sent to GrowthBook. They are only stored in memory locally within the SDK. This architecture eliminates huge potential security holes and keeps your user's PII safe and secure.
Each attribute has 3 parts:
- The attribute name itself. This is how the attribute will be referenced in the SDK.
- The data type of the attribute
- String - freeform text
- Number - Floats or integers
- Boolean - true or false
- Array of strings - useful for things like "tags"
- Array of numbers - useful anytime you have multiple numeric values
- Enum - When there are only a small list of pre-defined values it could take
- Whether or not it's an identifier. Identifiers are attributes which uniquely identify something - typically either a person, account, company, or device.
Override Rules
Every feature has a default value that is served to all users. The real power comes when you define override rules that let you run experiments and/or change the value based on targeting attributes.
Override rules are defined separately for each environment (e.g. dev and production). This way you can, for example, test an experiment rule in dev first before deploying it to production.
The first matching rule for a user will be applied, so order matters. If there are no matching rules, the default value will be used.
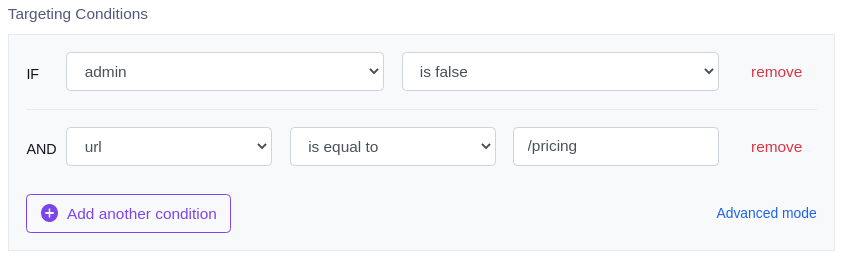
Conditions
Rules can specify conditions to limit which users the rule applies to. These conditions are evaluated against the targeting attributes in the SDK.
There is an easy-to-use UI for simple conditions:
In advanced mode, you can specify conditions using the MongoDB query syntax. This enables you to have nested logic, advanced array operators and more. Here's an example:
// Either the user's name starts with "john"
// OR they are over 65 and have a kid who's a doctor
{
  "$or": [
    {
      "name": { "$regex": "^john" }
    },
    {
      "age": { "$gt": 65 },
      "kids": {
        "$elemMatch": {
          "profession": "doctor"
        }
      }
    }
  ]
}
Note: We use the MongoDB query syntax because it is easy to read and write and is well documented. The conditions are never actually executed against a database. Instead, our SDKs include a light-weight interpreter for this syntax that runs entirely locally.
Forced Value
The simplest type of override rule is a "Forced Value" rule. This forces everyone who matches the targeting condition to get a specific value. For example, you could have a feature default to OFF and use force rules to turn it ON for a specific list of countries.
Percentage Rollout
Percentage Rollout rules let you gradually release a feature value to a random sample of your users.
Rollouts are most useful when you want to make sure a new feature doesn't break your app or site. You start by releasing to maybe 10% of users. Then after a while if your metrics look ok, you increase to 30% and so on.
For rollout rules, you choose a user attribute to use for the random sample. Users with the same attribute value will be treated the same (either included or not included in the rollout). For example, if you choose a "company" attribute, then multiple employees in the same company will get the same experience.
Experiments
The last type of rule is an Experiment. This randomly splits users into buckets, assigns them different values, and tracks that assignment in your data warehouse or analytics tool.
Experiments are most useful when you aren't sure which value to assign yet.
Here's what an Experiment rule looks like in the GrowthBook UI:
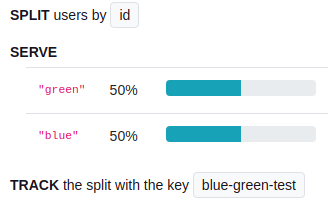
In the vast majority of cases, you want to split traffic based on either a logged-in user id or some sort of anonymous identifier like a device id or session cookie. As long as the user has the same value for this attribute, they will always get assigned the same variation. In rare cases, you may want to use an attribute such as company or account instead, which ensures all users in a company will see the same thing.
If the total variation percents add up to less than 100%, the remaining users will skip the rule and fall through to the next matching one (or the default value) instead.
You can analyze the result of an Experiment the same way you would any experiment in GrowthBook.
Namespaces
If you have multiple experiments that may conflict with each other (e.g. background color and text color), you can use namespaces to make the conflicting experiments mutually exclusive.
Users are randomly assigned a value from 0 to 1 for each namespace. Each experiment in a namespace has a range of values that it includes. Users are only part of an experiment if their value falls within the experiment's range. So as long as two experiment ranges do not overlap, users will only ever be in at most one of them.
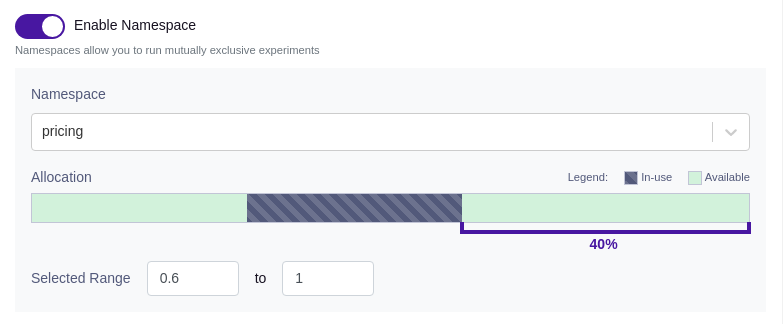
Before you can use namespaces, you must configure them under Settings > Namespaces.
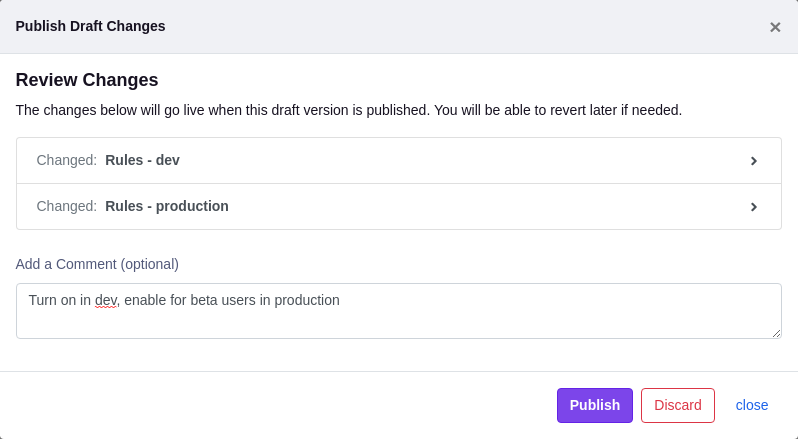
Publishing Changes
When you make changes to a feature's definition (default value or override rules), a new draft version of the feature is created automatically. This draft version is unpublished and is only visible within the GrowthBook UI, not to your users.
You can continue adding changes to this draft and when you are ready, publish them all at once with an optional commit message.
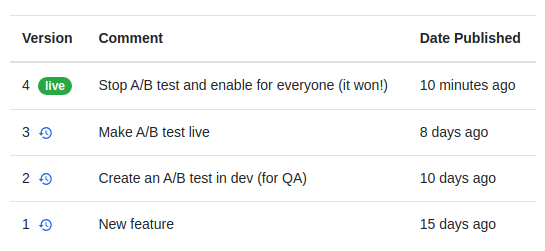
Revision History
You can view a revision history for your feature and revert to a past version by clicking the blue revert icons. This will create a new draft based on the past version you select, so you can safely review it (or add additional changes) before deciding to publish.
SDK Connections
In order to use feature flags in your application, you need to create an SDK Connection in GrowthBook.
At a high level, the SDK Connection generates a unique clientKey which grants read-only access to feature flags in a specific environment. The SDKs use this to fetch feature flag states and override rules from the GrowthBook API.
On GrowthBook Cloud, we have a global CDN in front of the API (https://cdn.growthbook.io) to ensure low latency responses from anywhere in the world. The CDN has a 30-second TTL, so changes to a feature may take a little time to be reflected.
GrowthBook Proxy
We also offer a pre-built proxy server you can deploy on your own infrastructure. This can be put in front of either GrowthBook Cloud or a self-hosted GrowthBook instance.
The GrowthBook Proxy offers the following benefits:
- Fast - Requests served from an in-memory cache close to your app servers
- Scalable - A single Proxy server can handle over 10,000 reqs/second. Horizontally scale for more
- Responsive - Changes in GrowthBook are rolled out to users in under a second